Monday, July 13, 2015

Packing Breakables


We're moving! As our apartment is quickly filling with boxes, I thought I would share my techniques for packing breakable items for an out-of-state move. This is our FOURTH out of state move in six years! All of the items in the picture were packed in one box along with 6 picture frames and two small photo albums.

There are two items I find very important for packing these items are packing foam and Packing Paper. I linked to the packing paper I've used for our last two moves. The pack of 120 sheets is typically enough for packing nearly all of my breakables and picture frames.


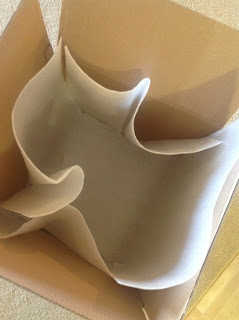
To start, tape the bottom of the box shut and place it on top of the foam. Cut two strips the width of the box to line the sides, like this:


For each vase and other breakable, I wrap them first with packing paper, then secure with a layer of foam. Make sure the foam is taped flat on the bottom so that the items can sit upright in the box.


For smaller items, place on opposite sides of the packing paper. Roll towards the center and wrap the ends like a burrito. Tape shut. I placed it in a plastic bag to keep it from rolling around in the box:


For picture frames, place tape across the glass. This helps keep the glass from breaking -- and if it does break, it keeps the glass of completely shattering. Finish by wrapping the frame with packing paper to prevent the frame from being scratched.


When packing breakables fill the box to prevent items from moving in transit. Empty spaces can be filled with crumpled packing paper.


Here's what the box looked like partially packed. Place frames on their side to prevent pressure being placed on the glass. 


Place the lightest items on the top to fill the box. I had silk flowers in two of the vases, which I used to fill the remaining space. And tape shut!


Make sure to label the boxes! Clearly mark FRAGILE on the top and the sides.

That's it! We're planning a new series to roll out while we are in the middle of the moving process. There are also a few new posts in the works for the Summer Reading series.


Saturday, July 4, 2015

Happy Independence Day!


For this installment of the Simple Saturday Project series, I chose a Patriotic-themed monogram! I love monograms and enjoy finding any way I can to incorporate them into decor. Lucky for me, monograms are very "in" right now so they are easy to find anywhere! Target has even been carrying unfinished wooden letters for this very purpose. 


This project is relatively simple, just takes some time to allow the paint to dry. Here are the supplies you will need:
  • Wooden letter. I recommend a "Block" style letter (rather than script or cursive), as it is easier to paint if the letter is wide and square.
  • Blue, Red, and White  acrylic paint
  • Masking Tape ("Painters tape") -- this is what you will use to create the stripe effect
  • Star stickers (I found these in the scrapbooking section)
  • Burlap ribbon -- I recommend wired ribbon, as it helps the bow keep its shape.

Here is an image of the colors I used -- Cobalt Blue, White, and Bright Red. These are cheap paints -- 69 cents each! 


To start, choose which area you want to put the blue square. Be careful to use the tape in very straight lines and press firmly to prevent the paint from bleeding through the lines created by the tape. Wrap the tape all the way around the letter as you will also paint the back.


Here's what it looked like with just the blue quadrant painted. I let the first coat dry, then added a second coat 30 minutes later. 


Leave the tape in place and paint the rest of the letter white. I used two coats. 


Taping out the stripes is the most labor-intensive part of this project. Make sure you're carefully placing the tape to allow for clean, straight lines. Allow the white to dry at least 90 minutes or the masking tape will lift the paint off. 


To make sure my red stripes were the correct size, I used this little piece of tape to measure them out. I recommend taping the whole letter before you begin painting with the red. (I forgot to take a picture of this part of the project, so I captured it after I started the red).


Before you begin painting the red, place tape over the edges of the blue quadrant to prevent overlap. Then cover all exposed white areas in red. You don't have to completely cover the tape. I just got a little over zealous with the paint!


Allow the red stripes to dry for several hours. I left mine to dry overnight, but it probably would have been fine after 2-3 hours. Remove tape. Place stars in the blue quadrant. If you plan on leaving this outside for an extended period and it will be exposed to the elements, I recommend placing a dot of hot glue to place the stars. 


Just add your ribbon and you're all finished! I used a command hook to attach it to the door. I love how it turned out.

Hope everyone has a safe and happy 4th of July!! 
Also, we have a new series that we will be unveiling soon -- stay tuned!


Friday, July 3, 2015

How do you know when you're "ready?"

With one of us working as a psychologist, and the other working in radio, I think our perspectives on being "ready" to be parents is somewhat different. I've had this conversation with many partnered friends of ours, trying to figure out when others determined they were ready. It turns out we know several people who had surprise pregnancies, so their situation decided for them! For those of us with the luxury of choosing when to start a family, it sometimes feels like a heavy responsibility to choose the "right" time (knowing that no one seems to ever be 100% for the difficult journey of parenthood).

For me, I wanted to make sure we were ready as a couple to handle the stress and sleepless nights. I'm still not sure I'll ever be ready for the extreme sleep deprivation described by the majority of mom friends I have with newborns. I'm going to just hope that by the end of my maternity leave, the baby will be sleeping for at least 4-hour stretches at night (I can at least dream, right?). Over the last 13 years, we have encountered quite a bit in terms of stress, and I feel confident that we can face things head-on as a team. 

As a future mom-to-be, I also feel it is important to be able to have a patience necessary to deal with things diverging from my set plan significantly. I do think working as a therapist helps with this, as I constantly have to alter my plans for treatment based on constantly changing variables with my clients. While I consider myself a fairly patient person, I was raised by a mother with the patience of a saint -- seriously, cool, calm and collected when it came to anything involving her kids. I hope she will be able to help my continued growth in this area. I'm also working on mindfulness practices to help further enhance this. I'll plan to make a post all about mindfulness in the future, because I think it can benefit anyone (even those of you who aren't planning to have babies and toddlers),

The other major variable I considered important in evaluating my own "readiness" was financial stability. Initially, I considered the possibility of having a child while in graduate school. This ended up being a completely irrational plan because I was required to "work" year-round as an unpaid intern to gain experience as a therapist. Currently our timeline to conceive is completely dependent on my job search. I'm finished with school now and actively job hunting. I anticipate finding a new job in the next month or so.

I'm happy to have this space to share these thoughts. If you'd like, comment about what your thoughts are about being "ready" to conceive and ready to become a parent.